Table of Contents
- What is HTML?
- World First Website
- The Concept of Hyperlinks
- What is a Markup Language?
- Understanding Tags
- What is Heading
- What is Paragraph Tag (Quick Example)
- Types of Heading Tags
- The Paragraph Tag
- What is an Element?
- Horizontal Rule (hr)
- Line Break (br)
- Introduction to HTML Lists
- Types of Lists (Ordered & Unordered)
- Creating Hyperlinks
- Adding Comments in HTML
- The Anchor Tag (a)
- Attributes Explained
- Adding Images (img)
- Image Maps (Clickable Images)
- HTML Documents
- The <!DOCTYPE> Declaration
- HTML Headings
- HTML Paragraphs
- HTML Links
- HTML Images
- How to View HTML Source
What is HTML?
HTML (HyperText Markup Language) is the standard markup language used to create web pages. It describes the structure of a web page and consists of a series of elements that tell the browser how to display the content.
HTML is not a programming language, but rather a markup language that defines the structure and layout of web documents.
Key Points about HTML:
- HTML stands for HyperText Markup Language
- HTML describes the structure of web pages
- HTML consists of a series of elements
- HTML elements tell the browser how to display content
- HTML elements are represented by tags
World First Website
The world's first website was created by Tim Berners-Lee in 1991. It was hosted on the NeXT computer at CERN (European Organization for Nuclear Research) in Switzerland.
The first website was very simple and contained:
- Information about the World Wide Web project
- A list of people working on the project
- Links to other pages with more information
- A simple text-based interface
The original URL was:
http://info.cern.ch/hypertext/WWW/TheProject.html
This marked the beginning of the modern World Wide Web as we know it today.
The Concept of Hyperlinks
Hyperlinks are fundamental to the web. They allow users to navigate between different web pages and resources by simply clicking on text or images.
Hyperlinks can:
- Link to other web pages
- Link to different sections on the same page
- Link to files for download
- Link to email addresses
- Open new browser tabs or windows
The concept of hyperlinks was invented by Tim Berners-Lee and is what makes the web "hypertext" - text that is connected in non-linear ways.
What is a Markup Language?
A markup language is a system for annotating text to define its structure and presentation. It uses tags to mark up the content.
Key characteristics of markup languages:
- Use tags to define document structure
- Separate content from presentation
- Are human-readable
- Can be processed by computers
- Follow specific syntax rules
HTML is a markup language, while programming languages like JavaScript are used for functionality and logic.
Understanding Tags
Tags are the building blocks of HTML. They are keywords enclosed in angle brackets that define HTML elements.
Types of Tags:
- Opening tags: <tagname>
- Closing tags: </tagname>
- Self-closing tags: <tagname />
- Void elements: Tags that don't need closing (like <br>, <img>)
Example:
Click to view code example
<p>This is a paragraph.</p>
What is Heading
Headings are used to define the hierarchy and structure of your content. They create a document outline that helps both users and search engines understand the content structure.
Headings are important for:
- Creating a logical document structure
- Improving accessibility for screen readers
- SEO (Search Engine Optimization)
- Visual hierarchy on the page
What is Paragraph Tag (Quick Example)
The <p> tag defines a paragraph in HTML. It automatically adds space before and after the paragraph content.
Quick Example:
Click to view code example
<p>This is my first paragraph.</p>
<p>This is my second paragraph.</p>
Types of Heading Tags
HTML provides six levels of headings, from <h1> (most important) to <h6> (least important).
Heading Hierarchy:
- <h1> - Main heading (usually one per page)
- <h2> - Major sections
- <h3> - Subsections
- <h4> - Minor subsections
- <h5> - Small subsections
- <h6> - Smallest subsections
Visual Example:
The Paragraph Tag
The <p> tag is one of the most commonly used HTML elements. It defines a paragraph of text.
Characteristics:
- Block-level element
- Automatically adds margin above and below
- Can contain inline elements
- Supports global attributes
Advanced Usage:
Click to view code example
<p>This is a <strong>bold</strong> word in a paragraph.</p>
<p>You can also use <em>emphasis</em> in paragraphs.</p>
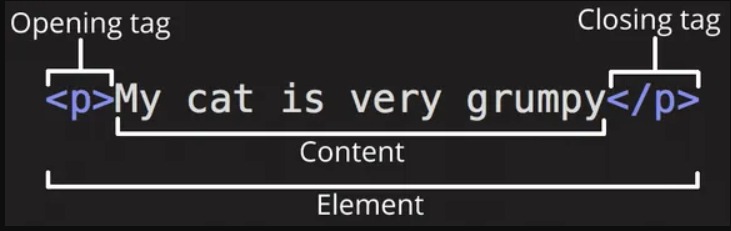
What is an Element?
An HTML element is a complete structure that consists of an opening tag, content, and a closing tag (or just a self-closing tag).
Element Structure:
- Opening tag: <tagname>
- Content: Text, other elements, or media
- Closing tag: </tagname>
Examples:
Click to view code example
<!-- Complete element -->
<p>This is a paragraph element.</p>

<!-- Element with nested elements -->
<div>
  <h1>Title</h1>
  <p>Content</p>
</div>

<!-- Self-closing element -->
<img src="image.jpg" alt="Image" />
Horizontal Rule (hr)
The <hr> tag creates a horizontal line that can be used to separate content sections.
Usage:
- Separate different sections of content
- Create visual breaks in the page
- Improve content organization
Example:
Click to view code example
<p>First section content</p>
<hr>
<p>Second section content</p>
Line Break (br)
The <br> tag creates a line break within text content. It's a self-closing tag.
When to use <br>:
- Breaking lines in addresses
- Creating line breaks in poems
- Separating lines in contact information
Example:
Click to view code example
<p>
  John Doe<br>
  123 Main Street<br>
  New York, NY 10001
</p>
Introduction to HTML Lists
HTML lists are used to group related items together. There are three main types of lists in HTML:
- Unordered lists (<ul>): For items where order doesn't matter
- Ordered lists (<ol>): For items where order matters
- Description lists (<dl>): For terms and their descriptions
Lists help organize content and make it easier to read and understand.
Types of Lists (Ordered & Unordered)
Unordered Lists:
Use <ul> and <li> tags. Items are marked with bullets by default.
Click to view code example
<ul>
  <li>Coffee</li>
  <li>Tea</li>
  <li>Milk</li>
</ul>
Ordered Lists:
Use <ol> and <li> tags. Items are numbered by default.
Click to view code example
<ol>
  <li>First item</li>
  <li>Second item</li>
  <li>Third item</li>
</ol>
Creating Hyperlinks
Hyperlinks are created using the <a> (anchor) tag with the href attribute.
Basic Link:
<a href="https://www.example.com">Visit Example</a>
Different Types of Links:
- Absolute URLs: Full web addresses
- Relative URLs: Paths relative to current page
- Anchor links: Links to sections on the same page
- Email links: Open email client
The Anchor Tag (a)
The <a> tag defines a hyperlink, which is used to link from one page to another.
Important Attributes:
- href: Specifies the URL of the page to link to
- target: Specifies where to open the link (_blank, _self, etc.)
- title: Provides additional information about the link
- rel: Defines the relationship between current and linked document
Advanced Example:
<a href="https://www.example.com" target="_blank" title="Visit Example Website">Example</a>
Attributes Explained
Attributes provide additional information about HTML elements. They are always specified in the opening tag.
Attribute Syntax:
<tagname attribute="value">Content</tagname>
Types of Attributes:
- Required attributes: Must be present for the element to work
- Optional attributes: Provide additional functionality
- Standard attributes: Can be used with most elements
- Event attributes: Define actions when events occur
Common Attributes:
| Attribute | Description | Example |
|---|---|---|
| id | Unique identifier | id="header" |
| class | Class name for styling | class="button" |
| style | Inline CSS styles | style |
| title | Tooltip text | title="Click here" |
Adding Images (img)
The <img> tag is used to embed images in HTML pages. It's a self-closing tag.
Essential Attributes:
- src: Specifies the path to the image file
- alt: Provides alternative text for accessibility
- width: Sets the image width
- height: Sets the image height
Example:
Local Image Example:
Here's an example using a local image from our images folder:
<img src="images/cat.jpg" alt="Image of a cat" width="300" height="200">
Image Maps (Clickable Images)
Image maps allow you to create clickable areas within an image that can link to different pages or perform different actions. This is useful for creating interactive diagrams, navigation menus, or detailed maps.
How Image Maps Work:
- The <img> tag uses a usemap attribute to reference a map
- The <map> element defines the clickable areas
- The <area> elements define each clickable region within the map
Area Shape Options:
- rect: Rectangular area (coords: x1,y1,x2,y2)
- circle: Circular area (coords: center-x,center-y,radius)
- poly: Polygonal area (coords: x1,y1,x2,y2,x3,y3,...)
Example: Interactive Desk Image
Click on different parts of the desk image below:

HTML Code:
<img src="images/desk.jpg" alt="Interactive Desk" width="400" height="300" usemap="#deskmap">

<map name="deskmap">
  <area shape="rect" coords="50,50,150,120" href="#computer" alt="Computer" title="Click for computer info">
  <area shape="rect" coords="200,80,300,140" href="#books" alt="Books" title="Click for books info">
  <area shape="rect" coords="320,180,380,220" href="#lamp" alt="Lamp" title="Click for lamp info">
  <area shape="circle" coords="100,200,30" href="#drawer" alt="Drawer" title="Click for drawer info">
</map>
Interactive Areas:
- Computer Area: Rectangle from (50,50) to (150,120)
- Books Area: Rectangle from (200,80) to (300,140)
- Lamp Area: Rectangle from (320,180) to (380,220)
- Drawer Area: Circle at (100,200) with radius 30
Practical Uses:
- Interactive floor plans
- Product diagrams with clickable parts
- Geographic maps
- Navigation menus
- Educational diagrams
Note: Coordinates are measured in pixels from the top-left corner of the image (0,0). You can use image editing tools to determine the exact coordinates for your clickable areas.
HTML Documents
All HTML documents must start with a document type declaration: <!DOCTYPE html>.
The HTML document itself begins with <html> and ends with </html>.
The visible part of the HTML document is between <body> and </body>.
Example
<!DOCTYPE html>
<html>
<body>
<h1>My First Heading</h1>
<p>My first paragraph.</p>
</body>
</html>
The <!DOCTYPE> Declaration
The <!DOCTYPE> declaration represents the document type, and helps browsers to display web pages correctly.
It must only appear once, at the top of the page (before any HTML tags).
The <!DOCTYPE> declaration is not case sensitive.
The <!DOCTYPE> declaration for HTML5 is: <!DOCTYPE html>
HTML Headings
HTML headings are defined with the <h1> to <h6> tags.
<h1> defines the most important heading. <h6> defines the least important heading.
Example
<h1>This is heading 1</h1>
<h2>This is heading 2</h2>
<h3>This is heading 3</h3>
Heading 1
Heading 2
Heading 3
Heading 4
Heading 5
Heading 6
HTML Paragraphs
HTML paragraphs are defined with the <p> tag.
Example
<p>This is a paragraph.</p>
<p>This is another paragraph.</p>
This is a paragraph. HTML paragraphs are defined with the <p> tag.
HTML Links
HTML links are defined with the <a> tag.
The link's destination is specified in the href attribute.
Example
<a href="https://www.w3schools.com">This is a link</a>
Visit MDN HTML Docs for more info.
HTML Images
HTML images are defined with the <img> tag.
The source file (src), alternative text (alt), width, and height are provided as attributes.
Example
<img src="images/htmlimg.webp" alt="HTML Tutorial Image" width="400" height="200">
How to View HTML Source
Have you ever seen a Web page and wondered "Hey! How did they do that?"
View HTML Source Code: Click CTRL + U in an HTML page, or right-click on the page and select "View Page Source". This will open a new tab containing the HTML source code of the page.
Inspect an HTML Element: Right-click on an element (or a blank area), and choose "Inspect" to see what elements are made up of (you will see both the HTML and the CSS). You can also edit the HTML or CSS on-the-fly in the Elements or Styles panel that opens.
Adding Comments in HTML
Comments are used to add notes or explanations in HTML code. They are not displayed in the browser.
Comment Syntax:
Uses of Comments:
Example: